Quincy Center for Technical Education
Computer Technology Department
LET'S MAKE SOME CABLES1. Pull the cable off the reel to the desired length and cut. I have a box of cable at one end of my shop and a mark on the floor 10' away. For cable lengths which are a fraction of ten feet, I eye-ball the length as I pull the cable out of the box (also, my feet are about one foot long). For longer cables, I pull it out to the ten foot mark and go back to the box and pull the remaining fraction or another ten feet. If you are pulling cables through walls, a hole in the floor, etc., it easier to attach the RJ-45 plugs after the cable is pulled. The total length of wire segments between a PC and a hub or between two PC's cannot exceed 100 Meters (328 feet or about the length of a football field) for 100BASE-TX and 300 Meters for 10BASE-T. 3. Inspect the wires for nicks. Cut off the end and start over if you see any. You may have to adjust the blade with the screw at the front stripper. Cable diameters and jacket thicknesses vary.
5. Untwist the pairs and arrange the wires in the order of the desired cable end. Flatten the end between your thumb and forefinger. Trim the ends of the wires so they are even with one another. It is very important that the unstripped (untwisted) end be slightly less than 1/2" long. If it is longer than 1/2" it will be out-of-spec and susceptible to crosstalk. If it less than slightly less than 1/2" it will not be properly clinched when RJ-45 plug is crimped on.. Flatten again. There should be little or no space between the wires. |
 4.
Spread and arrange the pairs roughly in the order
of the desired cable end.
4.
Spread and arrange the pairs roughly in the order
of the desired cable end. 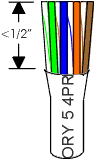
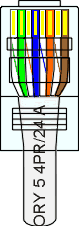 6.
Hold the RJ-45 plug with the clip facing down or away from you.
Push the wire firmly into the plug. Now, inspect
the darn thing... before crimping and wasting the plug!
Looking through the bottom of the plug, the wire on the far left side
will have a white background. The wires should alternate light
and dark from left to right. The furthest right wire is
brown. The wires should all end evenly at the front of the
plug. The jacket should end just about where you see it in the
diagram--right on the line. Aren't you glad you didn't crimp the
plug?
6.
Hold the RJ-45 plug with the clip facing down or away from you.
Push the wire firmly into the plug. Now, inspect
the darn thing... before crimping and wasting the plug!
Looking through the bottom of the plug, the wire on the far left side
will have a white background. The wires should alternate light
and dark from left to right. The furthest right wire is
brown. The wires should all end evenly at the front of the
plug. The jacket should end just about where you see it in the
diagram--right on the line. Aren't you glad you didn't crimp the
plug?